
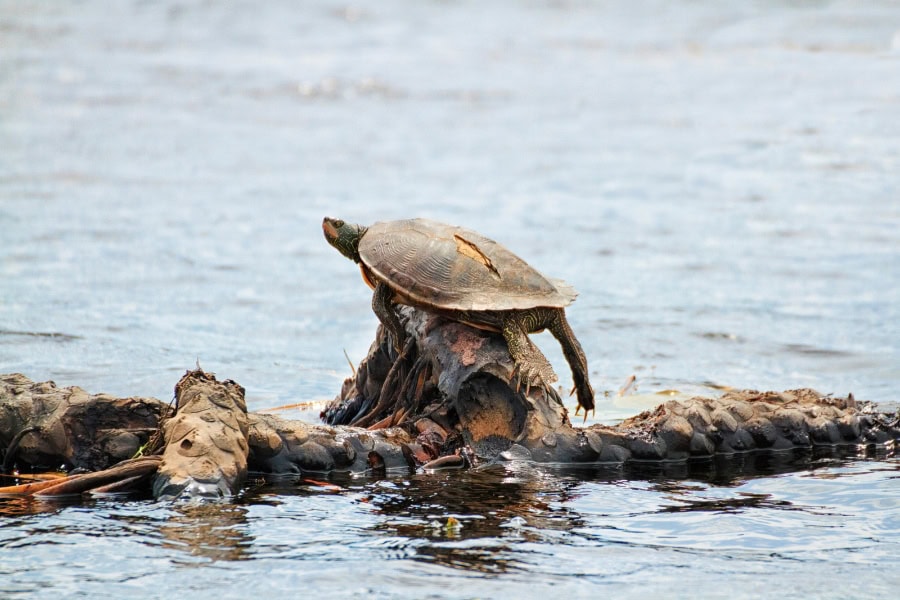
Stumbling across an injured turtle is a gut-wrenching moment for any animal lover.
After all, only a few special species are known to carry their entire home across their backs!
In fact, it’s impossible to detach a turtle from its shell. Turtles grow with their shells, never outgrowing them. Seeing their home, armor and a part of their skeleton damaged can make you feel helpless.
But hey, chin up!
This guide will walk you through everything you need to know, whether it’s a minor scrape or something more serious. There are simple ways to help – and you could make the difference between life and death for this resilient critter.
Let’s start filling in those cracks!
Table of Contents
Causes of Turtle Shell Fractures
Before we dive into what to do, here’s a quick look at the most common reasons why turtles end up with cracked shells:
- The Road Warrior: Sadly, cars versus turtles are all too common. Turtles crossing roads to find nesting sites or new territory are particularly vulnerable.
- Home Alone (and in danger): Pet turtles can get into serious trouble if they escape (they’re escape artists!) or are left unsupervised. A fall from a table, getting stepped on, or a run-in with a playful dog can result in injuries.
- Wild Kingdom: Predators like raccoons, foxes, and even birds of prey can inflict shell damage while attempting a tasty turtle snack.
- Oops, I Dropped It: Even well-meaning handling can sometimes lead to a dropped turtle, resulting in cracks.
- The Not-So-Great Indoors: Believe it or not, household hazards like lawnmowers, getting stuck in tight spaces, or even getting shut in a door can cause shell injuries.
Is It Just a Scratch, or Is It Serious?
In order to properly treat a cracked shell, let’s figure out how bad the damage really is.
Minor crack
When we say minor, it can either be a small crack or scratch with no bleeding and no exposed flesh. Perhaps, your turtle buddy is still acting normal (eating, swimming, being their usual active self) then all good!
If that’s the case then a bit of at-home care might be all they need.We’ll cover cleaning and care tips later.
Major injury
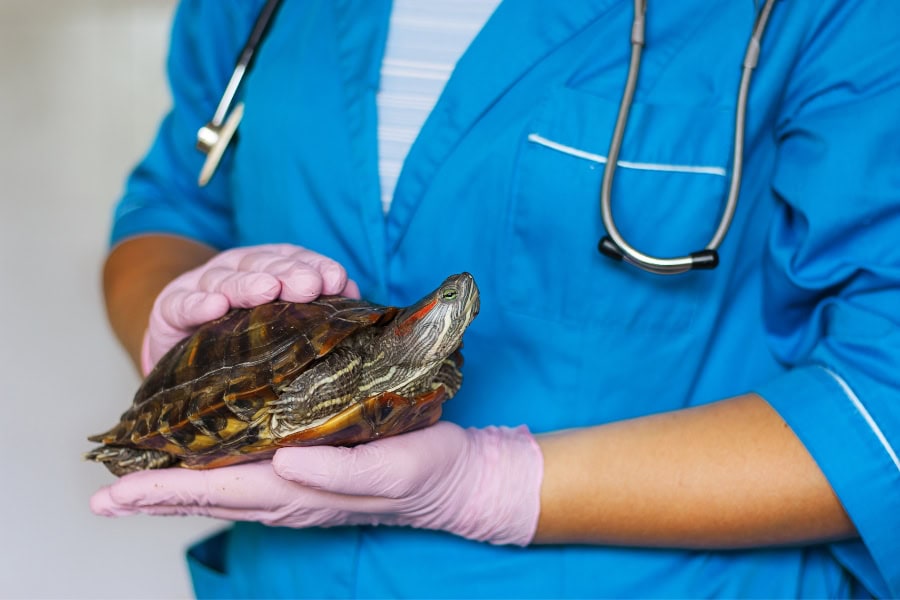
We’re talking about large open wounds, bleeding, damage to the head or limbs. Yikes! This calls for a possible vet trip! If the crack is deep, there’s bleeding, or the turtle seems lethargic or in pain, don’t try to play doctor at home.
Turtle anatomy is complex and you need an expert to factor in their semi-aquatic lifestyle and if this special shelled creature can go back to the wild.
The best thing to do is call your nearest wildlife rehabilitator or veterinarian specializing in reptiles.
A Step-by-Step guide to Fixing Minor Shell Fractures
Important Note: Even if you think the injury is minor, if you have any doubts, calling your local wildlife rehabilitator for advice is always smart. They can tell you if it needs pro care or if you’re good to help at home.
Step 1: Safety First (For You and the Turtle!)
Handle with Care: Injured turtles can be snappy, even your own pet. Gently scoop them up from behind (to avoid bites) and place them in a secure box or container with air holes. A bit of soft padding will keep them comfy during transport.
Wash Your Hands!: Don’t forget to wear your gloves. Turtles can carry bacteria like salmonella. It’s also best to wash your hands thoroughly before and after handling them, especially before eating or touching your face.
Step 2: At-Home Care for Minor Cracks
First off, whatever you do, don’t just find tutorials online for fixing cracks with epoxy or other materials, it’s incredibly easy to mess up and cause more harm than good.
It’s best to focus on keeping the wound clean and getting the turtle checked by a professional.
If the crack is minor and the wildlife center gives you the green light for at-home care, here’s what you’ll do:
Clean the Wound: Start with a gentle bath of warm water and a mild antiseptic like Betadine (make sure to dilute it until it looks like a weak cup of tea – too strong can be irritating). Using a soft cotton swab or a clean cloth, carefully remove any dirt or debris from around the crack.
Dry It Off: Pat the area dry with a clean, soft cloth. It’s gotta be super dry, because any extra moisture can be a breeding ground for bacteria, and we don’t want that!
A Little TLC: Depending on the advice you get from the wildlife center, you might apply a thin layer of antibiotic ointment specifically designed for reptiles, like silver sulfadiazine cream. Avoid ointments with painkillers in them, as these can be harmful to turtles.
Safe and Secure: Set up your turtle in a clean, quiet enclosure – think of it like a cozy hospital room. Keep things simple with paper towels on the bottom (easy to change out) and provide a shallow dish of fresh water along with their usual food.
Step 3: Monitoring and Healing
Now that you’ve provided the initial care, it’s time to play watchful nurse for a few days. Keeping a close eye on the healing process is super important, since even small problems can turn into something more serious if they’re not caught early.
Check-Ins: Take a good look at the wound at least twice a day for the first several days. You’re on the lookout for anything that seems off, like redness, swelling, any kind of oozing, or a strange smell. These are all signs of a possible infection, which means it’s time for a visit to the vet!
Healing Time: Minor cracks and scratches can often heal surprisingly well with proper care. Be patient – shell tissue takes time to regenerate. If you’re unsure whether the healing looks normal, don’t hesitate to snap a photo and send it to your wildlife rehab contact for a second opinion. They’ve seen it all and can reassure you if things are on track.
Keep them hydrated! If possible, gently place the injured turtle’s rear end in shallow, room-temperature water. This’ll help them rehydrate while you figure out the next step.

How Long Does Healing Take?
While every turtle is different, and the severity of the crack plays a big role, minor shell injuries can often heal within several weeks to a couple of months. Patience is key!
What Impacts Healing Time?
Okay, first thing’s first– a turtle’s shell isn’t just a shield; it’s part of their skeleton! It has bones, blood vessels, and nerves. So, a shell injury is just as serious as a broken leg for us. This means healing takes a while, and there are a lot of factors at play.
- Size Matters: Tiny turtles heal faster than big ol’ adults. Think of it like a kid getting a cast versus a grown-up.
- The Crackdown: A minor hairline crack? That might be a quick fix. But gaping wounds or multiple fractures mean a long road ahead.
- Overall Health: Like us, a healthy turtle mends better. If they were undernourished or already fighting an illness, it slows things down.
- Proper Care: This is huge! The right treatment (which involves a vet or rehabber) makes all the difference in ensuring proper healing and avoiding complications.
If you see no improvement after a few weeks, or if things seem to be getting worse instead of better, a visit to the vet is definitely in order. Sometimes, there might be a hidden problem that needs professional treatment.
What Happens Inside a Reptile Rehab?
When a turtle with a serious shell injury ends up in expert hands, whether it’s a wildlife rehabilitator or a vet who sees a lot of these cases, there’s a specific process designed to give your shelled friend the best chance possible.
Here’s an inside look at some of the key steps:
Step One: Squeaky Clean
Imagine having a huge cut that was exposed to dirt, maybe even road grime – ouch! The first priority is thorough wound cleaning. Rehabbers use specialized disinfectant solutions to flush out all that nasty stuff, preventing infection. This process might take several sessions over a few days, especially if the wound is deep or complicated.
Putting the Pieces Together
Depending on how jumbled the shell pieces are, vets or rehabbers will carefully attempt to reposition the fractured bone fragments if possible. This is where things get really tricky – sort of like solving a jigsaw puzzle with pieces that don’t perfectly fit. Sometimes, special materials like wire, pins, or a combination of different substances are used to hold those pieces steady while the body does its healing magic.
A Healing Cocoon
Vets and rehabbers might use fiberglass, medical grade epoxies, or other special materials like acrylics, to stabilize the shell and keep everything in place. It acts like a super-advanced cast, but with a few important differences designed specifically for turtle anatomy. These repairs are carefully monitored throughout the healing process, with adjustments or changes made as needed.
Rest and Recuperation
A big focus of rehab is on keeping the turtle safe, clean, and stress-free. Think of it as a ‘turtle hospital’ where they can dedicate all their energy to getting better. This involves controlled temperature, a balanced diet to support healing, and sometimes even gentle physical therapy to regain strength and mobility.
Let’s Talk About Prevention

While we can’t always control the dangers wild turtles face, we have a lot more say in keeping our pet turtles secure. Here’s how to create a safe shell-proof space, along with some insider tips from the pros:
The Great Escape: Making Your Enclosure Unbreakable
- Walls Matter: The height of your turtle’s enclosure needs to be more than a suggestion! Twice the turtle’s body length is a good rule of thumb. Remember, turtles are surprisingly good climbers.
- Secure the Lid: If it has a top, ensure it’s securely fastened. Turtles are stronger than they look and can dislodge a loose lid.
- Outdoor Supervision: It’s tempting to let your tortoise roam in the backyard, but a hawk flying by or a nosy raccoon could mean trouble. Supervised outdoor time only, and never leave them unattended.
Hazards in the Home: It’s Not Just About the Shell
- The Low-Down on Falls: Even a drop from a table or countertop can hurt a turtle. Keep them off furniture or, create a safe ‘exploration zone’ on the floor.
- Careful Footwork: Teach everyone in the household to be mindful of their feet. Shuffling instead of big steps helps avoid accidentally stepping on your little shelled friend.
- Off-Limits Areas: Doors can be a danger zone. Keep your turtle out of high-traffic rooms or hallways when it’s roaming indoors.
The Curious Pet Factor: When Dogs or Cats Share Your Space
- Supervised Interactions Only: Even the sweetest, gentlest pet can hurt a turtle on accident. Playtime together needs to be closely monitored, and even then, it’s best to keep it short and sweet to prevent anyone from getting overexcited.
- Separate Spaces: Ideally, your turtle should have its own dedicated enclosure. This reduces potential stress for both your turtle and other pets in the home.
The Feel-Good Ending
Nature can be tough, but sometimes a little human intervention can go a long way in helping these resilient creatures. Whether you handled things at home or your turtle pal received expert help, seeing them recover is incredibly rewarding. Remember, you’re a wildlife hero!

